While bicycle brakes offer excellent stopping power, there are a few reasons why the brakes might not be working properly. Over time the cables may stretch, the brake pads can wear out, a pad might drag on the rim or the brakes just might not be tight enough and you’ll find yourself looking for bike parts quickly. Because your safety depends on optimum braking, check out these guidelines for common adjustments to ensure that you can slow down and stop efficiently.
Keep in mind these instructions are for conventional brakes, not disc brakes. Do not work on your brakes unless you’re confident in your ability to do the job. Lastly, be sure that the wheels are true and round (not damaged or wobbly).
Tightening the Brakes
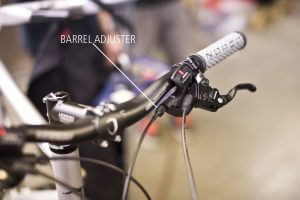
First, locate the barrel (see photo). It should have a graded edge for easy gripping eliminating the need for a tool. Turn the barrel counterclockwise by hand. Periodically, check the setting by squeezing the levers. When the brakes feel right, lock the barrel adjusters in position by turning the lock ring (the second knurled piece) clockwise until it’s tight against the lever.
This easy adjustment will make the brakes feel like new after you’ve logged several dozen miles and worn down the pads. It’s also great to tighten the barrels on the fly if the brakes feel weak mid ride. This can also happen when it’s muddy or wet. Once the brake pads are worn out, simply tightening the barrels won’t be enough. You’ll need to replace the pads.
Center the Wheel
A misaligned wheel will cause the brake pad to rub against the wheel. It has to be near perfectly centered between the brake pads for the brakes to work properly. To correct this, loosen the brakes, center the wheel, then retighten.
Center the Brake
If both wheels are centered and the brake still drags, the brake may have gotten bumped and knocked out of position. Double-check that the wheel is centered in the frame because you don’t want to ruin the brake adjustment if it’s actually set correctly.
To center side pull brakes (road bikes), loosen the attaching bolt behind the fork crown or brake bridge until the brake is loose. (It should move sideways when you push it). Now, squeeze the lever to hold the brake pads against the rim while you tighten the brake bolt on the back of the frame. If the brake still needs minor fine-tuning, look for a small screw on top of the brake. Turn it clockwise turns to move the brake shoe on the side of the screw away from the rim and vice versa.
To center linear-pull brakes (off-road and hybrid bikes), look for a small screw in the side of the brake arm. Clockwise turns of this screw will move the pad in the arm with the screw away from the rim and vice versa.
Brake Binding
Brakes should operate smoothly and easily. The brake pads should pull away from the rims as the levers are released. If this is not the case, the brake pivots or cables might be dry, causing binding. Free the pivots by lightly lubricate the brakes where the arms pivot and squeeze the levers repeatedly to work the lube into the brakes. Do not get any lube on the brake pads or rims. Wipe clean with rubbing alcohol if this happens.
If the problem continues, the chain might need some lube. Usually, this is only required on rear cables with split housing. Look closely at where the housing sections enter the stops on the frame. If the stops are split, you’ll be able to remove the housing and lubricate most of the cable. If the housing stops aren’t split, raise the bike so that gravity will draw the lube into the housing section. Apply a few drops of lube on the cable and squeeze the rear brake lever to draw the lube into the housing. Repeat for the front section of housing.
Is it time for new brakes? Shop The House.


