Rocker. Positive Camber. Rocker + Positive Camber. It reads like the ingredients list for a mad science experiment, but for a snowboarder these are tech terms you want to understand.

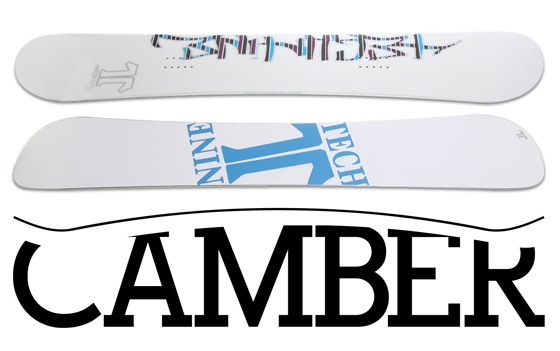
Positive Camber
To see a board’s camber profile, place the board base down on top of a table or another long, flat surface that extends beyond the tip and tail. If nothing like that is available, place it base down on the floor, but this works best if you can look at the board’s side profile from eye level.
First, if possible, get to eye level with the board’s edge so you can look straight-on at its side profile. With a camber snowboard, the area in between the bindings will be elevated off the surface. Press down on the elevated area and feel it flex to flat; when you relieve the pressure, the board recoils and the midsection is again elevated. That is positive camber.
People like positive camber boards for several reasons, including the “pop” it provides for ollies and airs, and the powerful edgehold for icy or variable snow conditions.

Rocker
Rocker has become very popular over the last few years, ever since Lib-Tech introduced its Banana Technology. Now rocker is present in nearly every snowboard line, and there are several different types.
To see a board’s rocker profile, lay it base down just like you did with the positive camber board. With standard rocker, the area in between the bindings is more or less flat instead of elevated, and if you push down on the midsection there won’t be that downward flex or recoil when you relieve pressure off the board. That is rocker, however there are multiple types, explained below.
With Tip Rocker, the nose of the board will be elevated off the flat surface, starting from your front binding. This makes the board float more easily in powder. For example, Burton’s S-Rocker uses this technology.

Tip and Tail Rocker offers a free-floating nose and tail, and that provides a very surfy ride in powder. With this combination, the board is typically flat binding-to-binding and the tip and tail then rise from outside the bindings. This combination is very good for powder, but not the best for icy conditions.

Then you have hybrid rocker. For example, rocker between your feet combined with positive camber at each end of the board. Or, positive camber between your bindings and rocker outside of them. The goal here is to offer the surfy ride of rocker with the pop and edgehold provided by positive camber. Companies continue to refine all these formulas and integrate them into their snowboard lines. Find the one that suits your style and get out there and ride.
Check out our full catalog of snowboards.
-Mike Horn


[…] For more information about other rocker and camber technologies check out our Understanding Rocker & Camber article here. […]
[…] For a better understanding of what rocker and camber are watch the video above or check out our article “Snowboard Rocker & Camber Explained”. […]
Im lookin n2 a new board 4 the upcommin season n im not sure what type of camber i should choose. generally i want a board that can do it all without sacrificing anything. i hit jumps, rails, and boxes but i rome the slopes and trails as well. any suggestions?
Thanx, Tutor.
Hey Devon, Here’s some of our suggestions to check out!
https://www.the-house.com/9854btcfv11zz-burton-snowboards.html
https://www.the-house.com/9854btcrl10zz-burton-snowboards.html
https://www.the-house.com/9854k2fp11zz-k2-snowboards.html
https://www.the-house.com/9852ltsbg11zz-lib-tech-snowboards.html
https://www.the-house.com/9854gnrcb11zz-gnu-snowboards.html
Let us know if we can help with anything else,
Feel free to email us too at [email protected]
Sincerely,
Adryan from The House Boardshop
[…] Snowboard Rocker & Camber Explained | The House […]
[…] is the Capita Green Machine. It comes in two different options. It comes in a both in a Camber and Rocker version. It’s a true twin shape. Ladies love it. Dudes love it. The core is pretty interesting. This […]
Devon, you can’t have it all. There is no “one size fits all” board. I’ve experienced that types of boards, sizes of boards and even bindings have a significant impact on your ride depending on conditions and terrain. To do it right you’ll need at least two boards for the conditions (icy or powder) or for terrain (parks or slopes). Sorry for the bad news, but to really enjoy the ride, you’ll have to be willing to spend the money. Your best bet is to buy your first board for your true passion, and rent, or demo if conditions change. I am no pro, but I have seen some of their lockers, and they own boards of all different styles, i.e. porches, f-150’s, hondas, sport bikes and cadillacs. Hope this helps.