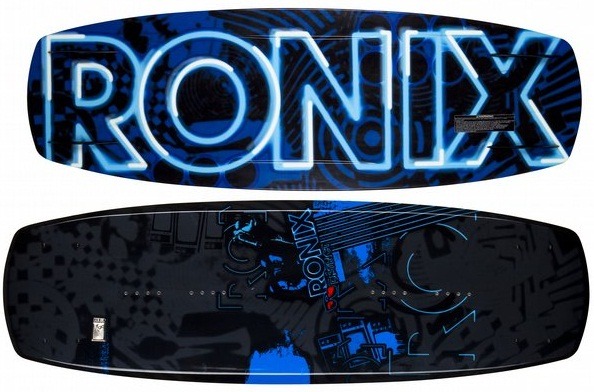
Ronix Wakeboards
We are really excited about the District’s utilities for its user friendly ride ability, easy to get used to, really works well on cable part. With a brand new 2011 District Wakeoard, all the new features make it so user friendly that it’s so predictable. So as I’m edging out, I know exactly how the board’s going to react and that will help me throughout everything I do. I’ll be bonding with the board and everything’s going to be simple and easy. One thing that we were really looking for in the design of the District was how can we come up with a board that will work for new riders and also work for a pro rider? How can we come up with a board that’s going to work at slow speed and it’s going to work at fast speed? Also, how can we come up with a board that’s going to work with a small wake and also a big wake? That was a lot of the fun things that we played with and it took us some time to really come up with that blend that worked for all of those different needs. Okay. Three stage. What are some of the really fun things with a three stage rocker? The most important part to a three stage rocker is how it takes off the wake, the poppiness of a three straight rocker really gives you that straight up pop.

A lot of people like how the board pushes up into you. How can we take that to the next level? What we wanted to do was we wanted still that abrupt pop but we wanted to add a little float to it. So, what we did was we played around with how we shaped the three stage in relation to the rider’s stance and then also how width came into play with mellowing out the abrupt pop so you get more of a floaty abrupt pop. We really like continuous rockers and so what we wanted to do was we wanted to incorporate continuous into this bottom rocker. The speed of a continuous rocker really helps me set an angle and an edge all the way through the wake and then keeps line tension throughout the whole trick and as well in the landing so I can keep drifting all the way out and not have too much of a hard impact landing. So, what we did was we blended outside of the three stage which is in the center. We blended continuous so the board could carry speed through the wake and also through the landings for a softer landing. We added for stability traction channels and we have six of them. We have two in the center and then we have two in the tip and two in the tail. With the traction channels, I just felt like the board really kept me on the surface and kept me going to the outside so that I could really figure my way out and get back into the next trick, and what these traction channels do is they give you stability when you’re pushing off the wake but also if you land a little tail heavy, you still get a little more stable feel. In the tip and the tail, the traction channels are wider.
Ronix used a lot higher speed video and we watched when the board was landing, and the board will land more tipped over to the side in the tip and tail where in the center of the board, as the board comes down, it comes down a little bit more flatter. So, we run them a little bit narrower. So we found it’s a more stable ride. The bevel in the center of the board tapers down into a really sharp bevel. And what we played a lot with was where that blend happened. So, we go from that rounded radius bevel into a sharp bevel, but we blended it right at your feet. So what we found is it really gave it a super clean edge. If you want a board that is not stereotyped for any kind of riding style, well, this is the right board for you.
Share This Story, Choose Your Platform!
Recommended Just For You
Popular Posts


Related Wake & Water Articles
October 12, 2021 | Wake & Water
August 3, 2021 | Wake & Water

August 3, 2021 | Wake & Water
August 3, 2021 | Wake & Water

June 18, 2021 | Wake & Water
May 14, 2021 | Wake & Water